[Or, “I can’t reliably & correctly load 180 beads/row on my needle!”]
The biggest issue standing in my way when it came to large bead tapestry was the number of beads per row. I’ve woven pieces as large as 110 beads across, and that experience told me that I needed a way to break things down if I wanted to do anything wider than that.
This question typically arises for beaders who have small looms and want to weave something larger than their loom will support. But it’s just as important for folks like me who don’t trust their ability to get the right beads in the right place every single row.
There are a lot of possible answers to this question:
The Bead Weaving Basics page at Mirrix Looms has a diagram that illustrates anchoring your current row of beads into the adjacent section, which is what I’m about to explain — of course, I didn’t find it until after I’d written this up. Sorry, Claudia and Elena.
The mind-boggling artist Douglas Johnson regularly creates tapestries with hundreds of thousands of beads. His Method page includes a photograph showing the sections he’s weaving on that particular tapestry. [Thanks, Erin, for the reference — what an unbelievable artist.]
Susan A. documents her method for weaving wide without weaving in sections, in A Fascinating and Original Way to Weave Wide Bead Pieces on a Mirrix.
So at least I had reassurance that it is possible to do this in a clean and well-crafted manner. The key question becomes: how do I join the sections so the “seams” won’t be apparent?
I’m hunting for the reference for this next suggestion — it’s what got me thinking about sections. Someone pointed out that you could “zip” woven pieces together by leaving off the column of beads between your pieces. Let’s say it’s two pieces. You lay them down side by side and anchor your thread in one piece, so that your needle is emerging on the “centermost” edge. Pick up the appropriate bead from the omitted column, and weave at least 2 or 3 beads into the other half. Then weave back to centermost — in the opposite direction this time — pick up the next new bead, and so on.
[I’ll go find that reference ASAP. I’m sure it was far clearer when the other author explained it.]
By adding a new bead between the two pieces, you eliminate the “seam” that would show if you just put them next to each other and stitched through the gap.
My little light bulb moment was that I didn’t have to have physically separate pieces of beadwork to use this trick. I could weave smaller sections; as long as I stitched into the adjoining section for 2 or 3 beads, the seam won’t be obvious and I retain some level of sanity. Here’s how it works.
Given the size of the Squib tapestry and the font I picked out for my color chart, I have 18 pages of charts. Each section has 31 beads across and 50 rows – the image is six sections across and three down. One page is a very convenient section size.
I wove my first two rows all the way across the warp, because first rows are annoying and I wanted to get them done. Then I wove the first section (that’s in the upper left hand corner) and stitched back through the section, until I was back at the foundation rows: I picked up the beads for the first row of the next section as usual.
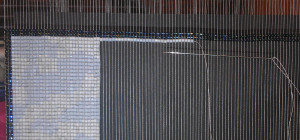 I sewed back through them, and wove into the two adjacent beads (the left-hand side of the first section).
 Then bring the needle out through the two beads just below, and I’m ready to start row two.
You want to always sew into the same number of beads each time. The seam might show a little while the tapestry is on the loom, but it disappears once it’s off and the warp tension is gone.
Breaking the tapestry down like this made it far less intimidating to design and weave. I hope it helps you too.


