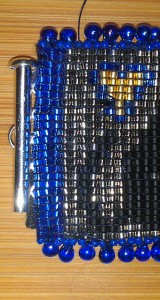
In the world of “no warp ends” bead weaving, I’m a throwback. If I’m making a bracelet, I will weave the warp ends in to finish the piece unless I’m in a screaming hurry. Yes, it’s time consuming — but it’s not much worse than hand hemming a dress, or blocking a lace shawl, or any other thing I’ve spent time and effort and money to create. The end result looks great.
There’s an invisible benefit that’s even more useful. Weaving the warp ends back into a bracelet reinforces the strength of the “fabric” exactly where it takes the most wear and tear: on the ends, where the clasp is attached.
After all the tedium of end-weaving, I want the clasp to be consistent with the rest of the workmanship. It has to be secure, both in terms of staying attached to the bracelet and in keeping the bracelet around my wrist. It needs to be attached elegantly, or at least in a way that doesn’t detract from the quality of the design or the weaving — I don’t want to see the stitches that hold the clasp in place on the front of the bracelet.
[My last requirement is inspired more by repairing torn clothes than reweaving broken jewelry. I’d like to attach the clasp in a way that minimizes stress on the thread I’ve used to weave my bracelet, as well as on the individual beads. If the clasp is sewn directly into the thread (without going through any beads), the movement of the bracelet as it’s worn will eventually cut through the thread. And if you’re sewing the clasp through your beads, are your beads strong enough to take the stress? I don’t use Delicas for their structural integrity…]
You can deal with all these issues by lining the whole bracelet with embroidery backing or denim or some other sturdy fabric, and then sewing the clasp to the lining. But you can get the same benefits, without the added weight and drape of fabric, by attaching the two halves of the clasp to a small tab of sturdy fabric and then sewing the fabric to the bracelet.
I’ve used this trick on loom woven bracelets that are sized about a quarter of an inch shorter than the length I wear, so it presumably can be used for no-warp-ends loom weaving without much modification. I haven’t tried it on other bracelet styles, but that’s probably only a matter of time…
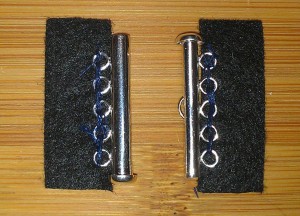
I want to add this 5-ring clasp to my cat yoga bracelet. I tried just sewing it together and it looked like cr….awful. So instead, I’m sewing each side of the clasp to its own little piece of embroidery backing, which I’ve cut to the same width as my bracelet (not including the edge embellishment).
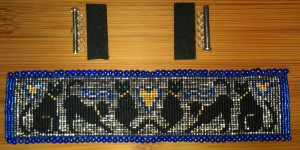 The tabs are the same width as my bracelet, but the clasp isn’t. So I (roughly) centered the clasp piece on the fabric tab, and then stitched the clasp to the tab.
After I attached the tab to the first half of the clasp, I slid the clasp back into one piece:
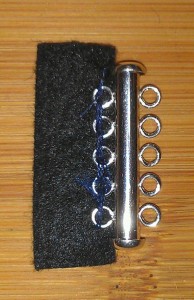 This lets me position the second half of the clasp on the second fabric tab, so the pieces will line up correctly when they’re attached to the bracelet.
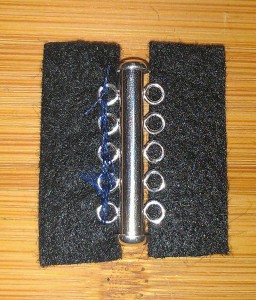 I trimmed the tab on the left so it was a closer match to its partner.
 Finally I attached each fabric tab to an end of the bracelet. I stitched the short ends of the tab through the edge Delicas, and stitched across the long edges directly across the warp threads. The fabric tabs distribute the strain of the clasp across the entire tab. The “protective layer” between the clasp and the weaving minimizes the risk of damaging the weaving through normal wear and tear. The image below shows me sewing through the edge Delicas.
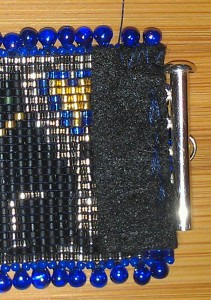
I kept an eye on both sides of the bracelet as I attached the tab. Otherwise I might not have noticed that the black tab is starting to show at the bottom of the bracelet — I can adjust its position as I sew around the tab.
Sew the second tab onto the bracelet, checking that it’s in the right position relative to the first half. Here’s what the finished piece looks like:

 It’s a great fit, and the clasp stitching is invisible.
I hope this helps, and if this has been documented anywhere else please leave a comment so I can add the reference.
Cheers!
